

Probably the most vital settings in FPV drone tuning is charges—they decide how your drone responds to stay inputs. In case your charges are too excessive, your quad will really feel twitchy and onerous to regulate. In the event that they’re too low, it could really feel sluggish and unresponsive. On this tutorial, I’ll break down what Betaflight charges are, how they work, why Precise Charges are the most suitable choice, and how one can decide the excellent charges to your flying type.

Charges Want Tuning
Similar to PID and filters, charges have to be high quality tuned to optimize your drone’s efficiency. You’ll be amazed by the numerous enhancements you’ll be able to obtain in your flying expertise by tuning charges to match your distinctive flying type and necessities.
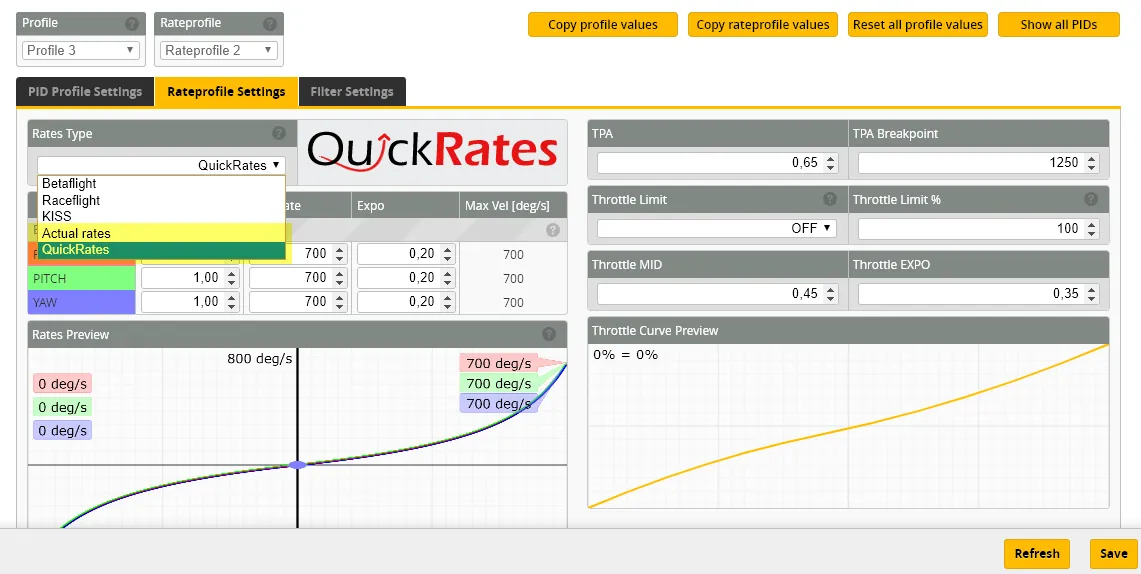
Betaflight affords a complete of 5 charge techniques:
- Precise Charges
- Betaflight Charges
- Raceflight Charges
- KISS Charges
- Fast Charges
Nevertheless, probably the most extensively used are Precise and Betaflight Charges.
On this tutorial, we’ll delve into the important thing options of Precise Charges and Betaflight Charges, how they work, and the way I discover my most popular charges. In case you are undecided which charge system to make use of, my advice for each rookies and skilled pilots can be to begin with the default – Precise Charges. It’s efficient and intuitive to make use of.
Understanding Precise Charges
“Precise Charges” are the default charges in Betaflight, offering a simple method to setting most rotational velocity (e.g., getting into 1000 corresponds to 1000deg/sec) and heart sensitivity values. No extra guessing, as this technique is much extra intuitive and fewer complicated for pilots in comparison with the older Betaflight charges.
In case you are new to the interest, I’d advocate utilizing Precise charges. For those who come from one other sort of charges, there are a lot of on-line software that aid you convert charge values between these totally different techniques.
There are 3 values in Precise Charges: Heart Sensitivity, Max Price, Expo.
Heart Sensitivity

Heart Sensitivity pertains to the responsiveness across the heart stick place. A decrease worth affords finer, smoother management, whereas a better worth leads to a extra reactive drone to stay motion.
Max Price
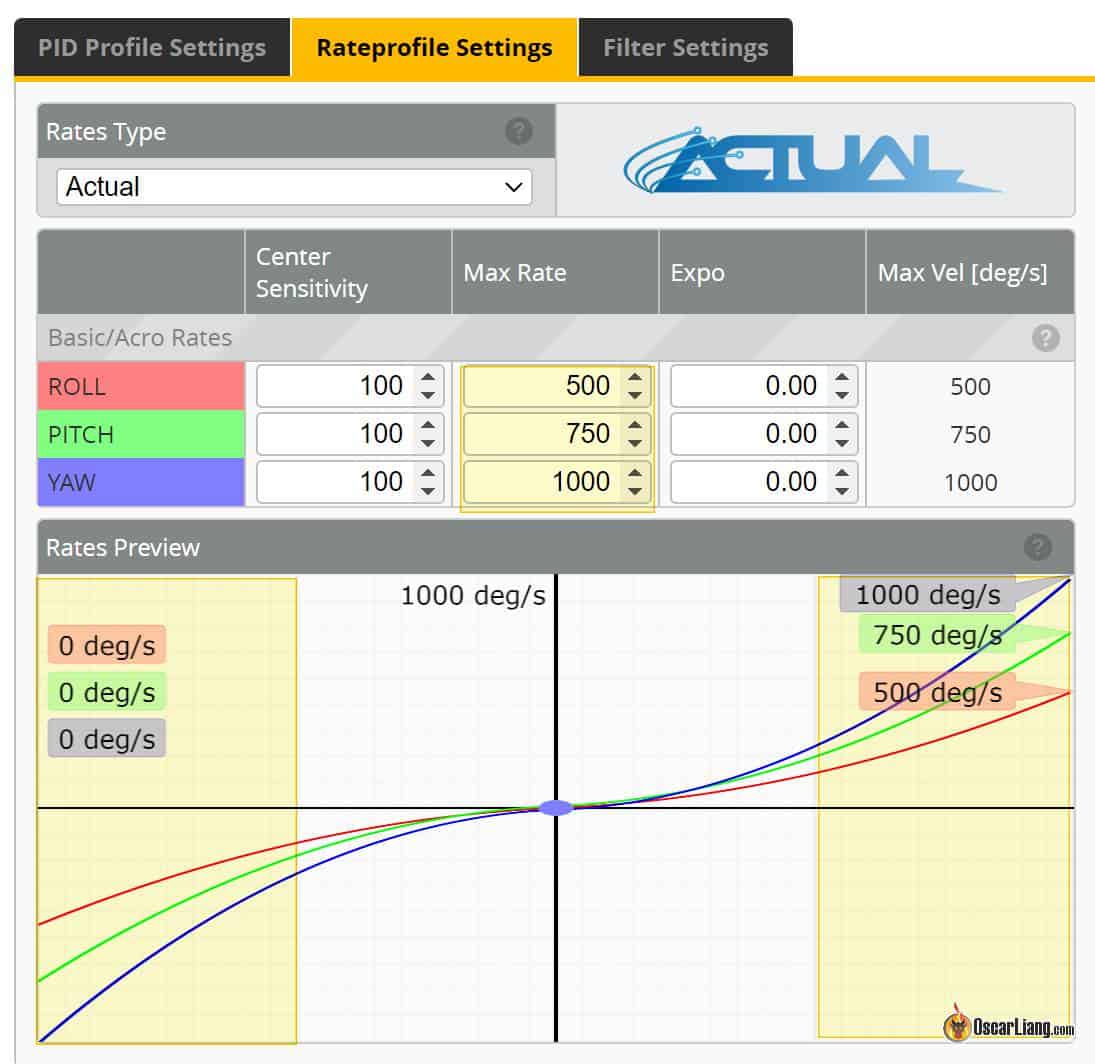
Max Price defines the drone’s spin pace at full stick deflection. The worth entered represents the precise most rotational velocity. For instance, getting into 700 means your drone will try to rotate at 700 levels/sec at full stick.
Nevertheless, take into account that the utmost angular velocity may be restricted by your motors. When motors attain their bodily limitations and can’t spin any sooner, the utmost angular velocity is capped, whatever the larger worth set in Betaflight.
Expo

Expo flattens the curve between heart stick and full stick. To realize a extra linear charge, maintain Expo low. For a broader heart stick area with finer management, improve Expo. Remember the fact that growing Expo additionally reduces heart sensitivity. Whereas Expo may be as excessive as 1.0, extreme Expo may trigger decreased heart stick sensitivity and make the drone’s response extra unpredictable in direction of full stick (extra jumpy).
Tuning Precise Charges
Begin by setting the Heart Sensitivity. Cruise round and navigate via gaps to check the specified management precision across the heart stick. For small changes and exact aiming via gates and gaps, the drone should be exactly managed. If the Heart Sensitivity is simply too excessive, the drone will overreact and turn out to be jittery. Evaluation your flight footage will aid you choose extra objectively.
Subsequent, set up your Max Price by performing flips and rolls – be sure to are pleased with how snappy your drone is. This step needs to be comparatively easy.
Lastly, follow freestyle strikes involving numerous stick positions between heart and full stick. To flatten the speed curve, add some Expo, however remember that this may scale back predictability in direction of full stick. For those who improve Expo an excessive amount of, you might want to boost Heart Sensitivity barely to compensate. Expo is primarily a matter of non-public choice.
Repeat this course of for roll, pitch and yaw, or you might copy the identical values for all 3 axes.
My Charges
Right here’s a common guideline for various flying kinds and functions primarily based on my private expertise:
- Cinematic / Racing: 500-800 Max Price
- Freestyle: 600-1000 Max Price
- Line of Sight: 1000+ Max Price
Then set heart sensitivity based on your flying type. Reducing heart sensitivity allows you to make tiny corrections with out jerky motion—that is particularly helpful for cinematic flying and {smooth} freestyle strains.
- Cinematic: 50-150 Heart Sensitivity
- Freestyle: 100-200 Heart Sensitivity
- Racing / Line of Sight: 150-300 Heart Sensitivity
Expo controls how {smooth} or aggressive your stick response is in the midst of stick journey. In case your quad feels too linear and robotic, including a little bit of expo could make actions really feel extra pure. For those who fly freestyle, a small expo curve makes methods like juicy flicks and snap rolls really feel smoother. However an excessive amount of expo could make actions far much less predictable.
- Cinematic: Excessive expo (0.4 – 0.7) for ultra-smooth photographs.
- Freestyle: Medium expo (0.3 – 0.6) for stability between smoothness and snap.
- Racing: Low expo (0 – 0.3) for fast, linear and predictable response.
My Freestyle Charges
Pitch/Roll
- Heart Sensitivity: 190
- Max Price: 1000
- Expo: 0.70
Yaw
- Heart Sensitivity: 200
- Max Price: 650
- Expo: 0.55
Notice that my charges differ relying on how I maintain the sticks. When “pinching”, my max charges are comparable, however heart sensitivity tends to be larger as a result of I can transfer the sticks extra precisely when I’m pinching in comparison with thumbing. Listed here are my thumbing charges for comparability:
Pitch/Roll (Thumbing)
- Heart Sensitivity: 140
- Max Price: 1000
- Expo: 0.50
Yaw (Thumbing)
- Heart Sensitivity: 180
- Max Price: 650
- Expo: 0.40
My Tiny Whoop Charges
Pitch/Roll
- Heart Sensitivity: 230
- Max Price: 1000
- Expo: 0.62
Yaw
- Heart Sensitivity: 250
- Max Price: 1300
- Expo: 0.68
Discover my yaw charge is just a little larger as a result of I take advantage of a number of yaw when flying tiny whoops indoor as a result of quantity of speedy sharp turns.
Delving into Betaflight Charges
Betaflight Charges is a legacy system, and whereas I don’t advocate it I believed it could be good to have just a little introduction for newcomers. Why I don’t advocate it? Properly, it’s more durable to make use of than Precise Charges as a result of the three phrases are interdependent, making it much less intuitive to make use of.
RC Price
RC Price impacts the speed curve’s slope linearly all through your complete stick vary and determines how rapidly the quadcopter rotates at full deflection. For those who’re aware of computer systems, you’ll be able to consider it as mouse sensitivity.
A better charge leads to a extra responsive however twitchier quad. Small stick actions will produce important quad actions. Growing the RC Price additionally boosts the quad’s spin pace, enabling sooner flips and rolls.

Nevertheless, take into account that the utmost angular velocity may be restricted by your motors. When motors attain their bodily limitations and can’t spin any sooner, the utmost angular velocity is capped, whatever the larger worth set in Betaflight.
RC Expo
RC Expo, often known as Exponential or just Expo, reduces sensitivity close to the stick’s heart the place high quality controls are wanted (for Roll, Pitch, and Yaw) however doesn’t change the utmost angular velocity at full stick.
Expo is a proportion worth, starting from 0% (0) to 100% (1). At 0%, the rise in rotational pace between minimal and most stick enter is linear, forming a “V” form with no stick enter within the heart. At 50% stick enter, your quad will rotate across the given axis at precisely half the utmost rotational velocity.

Growing Expo reduces sensitivity round mid-stick, requiring additional stick motion to attain the identical rotational velocity. Visualize Expo as reworking the “V” form right into a “U”, with a better expo proportion flattening the “U” across the center.
Tremendous Price
Tremendous Price (or just Price) will increase each max angular velocity and sensitivity across the heart stick.

By elevating the Tremendous Price, you’ll be able to keep reasonable stick sensitivity round mid-stick for normal flying maneuvers whereas nonetheless attaining snappy rolls and flips on the stick endpoints.
Tremendous Price primarily combines the consequences of RC Price and Expo, permitting for extra flexibility in attaining the specified stick really feel.

So why use Tremendous Price? We are able to simply use RC Price and Expo proper? Sure, kind of, however having Tremendous Price offers us extra flexibility in attaining the stick really feel we would like.
Tuning Betaflight Charges
Tuning charges in the end relies on private choice and “really feel.”
Start with the default Betaflight values: RC Price 1.0, Tremendous Price 0.7, Expo 0 for all three axes.
When tuning my charges, I at all times modify RC Price first. Carry out flips and rolls, and if the quadcopter spins too slowly, improve RC Price till happy. Notice down the max angular velocity (deg/sec) within the Betaflight Configurator. For my freestyle rig, I normally intention for round 700-800 levels per second.
Subsequent, merely cruise round (with out flips or rolls) and make sure the quadcopter responds swiftly and predictably to your stick inputs throughout turns. If it’s too delicate for exact motion, improve Expo. If it’s too sluggish to react (not delicate sufficient), lower Tremendous Price whereas growing RC Price to compensate and lift the max angular pace.
Expo isn’t at all times vital since Tremendous Price can present the identical impact. Nevertheless, when you nonetheless discover small actions round mid-stick too delicate, improve Expo till you strike the fitting stability between precision and responsiveness.
Professional Tip: Making use of Expo on the radio (TX) reduces your stick decision, so at all times set Expo within the flight controller software program each time attainable!
You could have to iterate via the method a number of instances till the charges really feel excellent. Do not forget that pitch, roll, and yaw charges don’t have to be similar—freestyle pilots usually want larger roll and yaw charges however decrease pitch charge, it’s all private choice.
Totally different flight controller software program has totally different ranges and scaling in PID, charges and expo, so the identical numbers don’t essentially give the identical leads to a distinct firmware. You need to be capable to discover on-line converters if you wish to migrate to a distinct FC firmware.
To offer you some examples, listed below are the Charges and Expos I used prior to now:
Freestyle
- RC Price – 1.2
- Tremendous Price – 0.77
- RC Expo – 0.20
Easy Cruiser:
- RC Price = 0.80
- RC Expo = 0.00
- Tremendous Price = 0.65
Expo is about to zero right here on objective, that is to keep away from overreacting in shut conditions and truly offers you total smoother consequence.
Aggressive Acro Quad:
- RC Price, Pitch/Roll = 1.80, Yaw = 2.00
- Tremendous Price, All = 0.64
- RC Expo, Pitch/Roll = 0.20, Yaw = 0.15
Tiny Whoop Charges
- Roll+Pitch: RC Price 1.2, Tremendous Price 0.75, Expo 0
- YAW: RC Price 1.3, Tremendous Price 0.80 Expo 0
- If utilizing acro mode, allow crash_recovery, there are some settings (get crash_ in CLI) you may wish to tune first to keep away from false self-centering.
As your flying talent improves, and also you turn out to be extra comfy performing aggressive manoeuvres, you could possibly attempt to crank up your charges. And additionally, you will in all probability wish to use a bit extra expo to keep up correct high quality management.
There isn’t a proper or fallacious Expo and Price values, so long as it fits you. For instance, I’ve shaky fingers, so my expo could be a bit larger than others. :p
Don’t Change Your Charges!
Some pilots modify their charges for various drones, however this may be counterproductive.
Sustaining constant charges throughout all of your quads is essential for creating muscle reminiscence. Having constant charges means that you can instinctively management the drone’s actions. For those who’re continually tweaking your charges, your instincts won’t ever absolutely develop. As an alternative, decide one set of charges and follow them—it will aid you construct constant, instinctive stick management, it doesn’t matter what you’re flying.
That stated, this rule primarily applies to quads of comparable measurement and energy. For those who’re flying drastically totally different plane—resembling a 5″ freestyle quad and a tiny whoop—it is sensible to regulate charges accordingly. These drones have very totally different flight traits and are flown in solely totally different environments, so utilizing totally different charges for every is each sensible and vital.
Throttle Mid and Throttle Expo
Throttle Expo modifies the form of the throttle curve, flattening it across the “Throttle Mid” level. This permits for a gentler throttle response and most stick decision round this throttle degree.
Throttle Mid adjusts the place within the throttle curve the place Throttle Expo is utilized. By default, it’s set to 50% throttle (0.50), however when you plan to make use of Throttle Expo, Throttle Mid needs to be set to the throttle of cruising pace. That is the place you’ll need probably the most throttle decision, and Throttle Expo may make altitude management simpler for you.
Throttle Mid is not going to have any impact when you set Throttle Expo to 0, as your throttle curve will stay a straight line whatever the Throttle Mid setting.
Alternatively, you’ll be able to arrange a throttle curve in your transmitter for much more exact throttle management.
Remaining Ideas: The Magic of Precise Charges
Switching to Precise Charges in Betaflight was a game-changer for me. It gave me full management over how my quad responds with out annoying unwanted effects from outdated charge techniques. For those who’re nonetheless on previous Betaflight charges, do your self a favor—change to Precise Charges and by no means look again. You’ll get smoother, extra predictable, and easier-to-tune management.
Edit Historical past
- 2015 – Article created
- 2018 – Article up to date
- 2021 – Added information about new characteristic in Betaflight: Precise Price
- 2022 – Utilizing Precise Price as the usual, up to date screenshots, up to date Price Tuning directions,
- 2023 – Simplified URL, optimized title
- Feb 2025 – Up to date tutorial